|
| Cathy, Danielle and Llyn with "bouquets" of Red Russian kale to share at the Food Pantry. |
Early spring in the Pacific NW
is a time of joyful anticipation of the coming growing season. We
already have hundreds of seedlings started in our greenhouses and, in a
few short weeks we'll be able to transplant many early-season crops
outdoors. But one of the great culinary pleasures of this time of year
is the kale that wintered over from last season. Kale is one of those
plants that when touched by a kiss of frost, becomes more sweet and
tender than when growing at the height of summer.
 |
| Eat your kale for healthy skin, hair, bones and teeth! |
There are many articles on-line about the nutritional benefits of kale and recipes for its preparation. You will
not find as many articles on-line about
growing kale, using it as a cover crop, or saving your own seed which is what this article is focused on. (See also our post:
Kale joins the "Dirty-Dozen' list: and How to Grow Your Own Kale)
But, before we get into growing kale and saving seeds, in researching this post I discovered two important facts:
Kale has the densest concentration of nutrients, per calorie, of a wide range of foods tested. (
PDF of 72 tested foods) (
explanation of chart).
And secondly, it is
extremely important that, the source of the kale you eat is organically grown.
"The health benefits of kale greatly depend on the source you buy it
from. Whenever you shop for kale, make sure to get organic kale, as it’s
one of the most heavily pesticide-sprayed crops. Two-thirds of produce
sampled in recent evaluations were poisoned with pesticides and non-organic kale ranks among the world’s most heavily polluted crops."(source)
| How to grow it: Kale won't grow well in the tropics or arid regions but it's
perfectly suited to a moist, temperate climate such as the Willamette
Valley of Oregon where we live. There are several varieties available.
The main two we grow are Toscana (or dinosaur) kale and Winter Red/Russian kale. With its
greyish-green leaves (without many frilly edges) and mild-flavored
tenderness, Toscana is perfectly suited to make roasted kale chips (recipe below). |
 |
| Toscana (or dinosaur) kale |
But for ease of growing and hardiness through the winter, our favorite kale is
Winter Red/Russian kale.
This kale actually has the nickname 'hungry gap', after the period in
winter in traditional agriculture when little else can be harvested.
We've had stands of it survive, outside and unsheltered through the
winter - through all but the most sustained snow and cold.
 |
| Toscana
kale is darker green and its leaves are less frilly (far left). Red
Winter kale, hardier and more vigorous (easier to grow through the
winter) is on the right. |
 |
| Sign, we put with kale at the Food Pantry as many people were unfamiliar with eating it. |
Typically we grow two main crops of kale per year. The
first
we start in early/mid-February. We either start them in pots/six packs
and transplant them outside (late March/early April) or we start them
directly in beds in the greenhouse. We pick from both these plantings
all the way until mid-July when a) the leaves become bigger and less
tender and b) there is so much else coming ripe that we prefer to eat!
In the heat of summer they often also become infested with aphids and
become inedible for this reason. This is then the perfect time to sow
the
second crop of the season (more on this below).
 |
| We
start seeds in plastic tofu-containers with holes drilled in the
bottom. We fill the containers mostly full of soil and press the soil
down evenly with the bottom of another container. After sowing seeds,
cover with scant, even layer of soil. Keep moist but don't over-water.
These seedlings above are lettuce plants (to show spacing of seeds). |
 |
| Once
seedlings are large enough to handle easily and they have
well-developed roots, but before they are root-bound, gently dump out
the batch of seedlings and tease them apart, placing one in each cell of
a six-pack. |
 |
| In
a few weeks, seedlings will grow and their roots fill the six-pack
cells. They are then ready to transplant into garden-beds (18" apart).
(Red Russian kale seedlings shown) |
We have also
sowed the seed loosely over a whole greenhouse bed
in February (ideally the seeds are about 2" apart) and cover them
lightly with topsoil. The kale comes up thickly filling the whole bed
and grows rapidly in the protected climate of the greenhouse. It is easy
to harvest whole clumps at a time with a sharp knife or scissors and,
as long as you don't cut below where the leaves generate from, the kale
will keep growing back all spring until a) you want to use the bed for
something else or b) the greenhouse gets too warm for the cool-loving
kale and it succumbs to aphids, or mold or gets too tough to enjoy.
 |
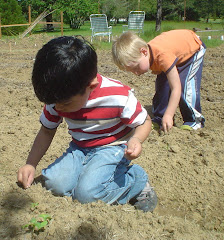
| Here,
Chris is harvesting kale that was sown directly in a greenhouse bed.
Using a sharp knife, he cuts off whole handfuls of kale leaving the node
where new leaves sprout untouched for future harvests. The leaves will
continue to re-grow for many, many months. |
The second main crop of kale (for fall and winter eating) is sown
in late July. It can be done in pots and transplanted, or loosely
scattered as a thick crop (either inside or outside a greenhouse). It's
counter-intuitive that you start these 'winter crops' in the peak of the
summer heat but the seeds need enough time to germinate, and the leaves
need long enough days to gain some height and volume as they will not
gain much in size once the day-length shortens after autumn-equinox
(Sept. 21 or so). We usually find it challenging to have enough room in
our greenhouses at the peak of summer to grow a large kale crop indoors
but, since kale does well outside, except in all but the harshest
winters, we've had good luck with growing it outside.
Kale as a cover-crop: Below are some pictures of an experiment we
did one year with kale as a cover crop. We sowed it thickly along with
fava beans (tried to space plants about 2" apart). This was done by
scattering the two varieties of seed and
very lightly tilling
them in with tiller at shallowest depth-setting. The kale did very well
and lasted all through the winter. The fava beans succumbed to a
sustained hard-frost and didn't survive till spring. After eating kale
all winter-long, we tilled the rest in as a source for 'green manure'.
This worked fine but we are now moving away from using the roto-tiller
in the spring as it really compacts our clay-dense soil but, if you're
still tilling in cover-crops and have a lot of kale-seed, it's a great
way to go!
 |
| Kale
and fava beans as a cover crop (planted in Sept., pictured in late
October). Kale survived the winter; favas did not (froze). We ate kale
all winter and tilled the kale into the soil in the spring as a 'green
manure' (for fertility). |
 |
| The same field of kale in February. OSU students harvesting a tub-full to take home and enjoy! |
Springtime bonus: Kale 'raab'
Though there are some
annual varieties of kale, most are
biennial and set seed in their second season, after wintering over.
If
you have some kale that has survived the winter, look for the start of
flowers forming. The best time to catch them is before the flowers begin
to open (below). These kale flowers, called 'raab' (pronounced 'rob')
are very tender and have a slight 'sweet' taste. They are
loaded with vitamins and minerals.
 |
| Kale
'raab' (pronounced 'rob') is the flowers of the plant before they fully
open. Tender, sweet and densely nutritious; a springtime treat!
(pictured: Red Russian kale-raab) Note: Pick some leaves and stems along
with the flowers; they'll still be tender at this time of year. |
 |
| Here's Llyn picking raab off a Toscana kale plant in March or April. |
 |
| Bella
loves kale, raw from the garden! We prefer to steam it for about 7-min.
and eat it with apple-cider vinegar or a splash of lemon-juice. |
Saving seed: One of the pleasures of growing your own food from seeds is to begin to
save
your own seeds. With most varieties, it's not difficult and the seeds
you save yourself will naturally select/adapt to be more perfectly
suited to your local climate and conditions. It also contributes to
having a greater sense of local food-security in case there ever comes a
time when seeds are not distributed over long distances, or there is a
seed-crop failure in another part of the country.
 |
| If
left to mature, the raab opens up into yellow flowers. Once the flowers
open, the plants become more woody and less pleasant to eat. |
 |
| The
flowers are pollinated and become seed-pods. Each plant can produce
thousands of seeds! Wait to harvest the seed-pods till they are mostly turning purplish/tan and the pods are drying out (see above). |
 |
| When ripe, the pods will easily open by rubbing them between your fingers yielding multiple seeds in each. |
It's important to find the right time to harvest seed. You want to
be sure the seeds are ripe enough that they are
fully black and pop easily out of the pods, but
don't wait so long that the birds eat your seed, or the pods shatter and spread the seed onto the ground below. Regardless of your best intentions, there are always
some
seeds that shatter out of the pods so you can anticipate 'volunteer'
seedlings to germinate in places you've let kale plants go-to-seed. We
have one place in a greenhouse that has germinated kale plants for a
third season in a row since we last let plants go to seed in that spot.
That's what we call a 'high-quality problem'!
 |
| Mature kale seeds. Each plant is capable of producing thousands of seeds. This is just a small fraction of those saved from one plant. |
You need to have some way of catching the seeds as the pods dry and open.
After clipping the ripe seed-stalks, slip them gently in a paper-sack
and hang in a dry place where birds and other animals can't reach them
until the pods are all dry. You can also put them upside-down in a
plastic tub or bucket. We have hung them from the rafters of our
garden-shed, or on a shelf above our wood-stove, or put them in the
greenhouse in a tub, on a shelf, covered by screens (to keep animals
from eating them).
Seeds are ready for
winnowing (separating seeds and chaff) when
the pods are crisp and dry and crush easily by rubbing them between your
hands. If it isn't in a tub already, carefully place the stalks of
seed-heads into a tub and rub the pods between your hands to shatter
them and release the seeds. As each stalk is cleaned, remove it from the
tub. In the end you will have a mixture of seeds and dried leaves/pods
(chaff). Winnowing is described in the caption below.
 |
| Here, Chris is giving a demonstration to Rook and Cindy of winnowing bean seeds (separating the seeds from the chaff).
On a lightly breezy day, or in front of an electric fan, slowly pour
seeds from one container into the other so the breeze blows the chaff
away and the seeds fall into the lower container. |
Storing seeds: Often, after winnowing, we continue to dry the seeds on a shelf above our woodstove. It is very important that they be
totally
dry or they can develop mold during storage. Heat can also destroy
seeds so don't dry them any more than is necessary. Store seeds in a
cool, dark place (or in your freezer, in an airtight container if you
have the room). If you are new to saving seeds, check the plastic bags,
jars or bottles a week or two after you store them to check there's no
mold growing. We've lost a few batches due to mold which is always a sad
thing when you go to check your seeds at the beginning of the next
growing season.
Here's a
LINK listing
all our other posts about saving your own seed.
 |
| Delicious and nutritious, spring "greens": Toscana and Red Russian kale flanked by "Red Sails" lettuce. |
Kale is easy to prepare and eat. We mainly use it steamed with a
little apple-cider vinegar or lemon juice sprinkled on top, or a little butter but it it also good in
smoothies (
recipes), fresh in a tossed salad (
recipe)
or baked into chips (
recipe). There are many great recipes on line. Always rinse
well before using.
In the spring, when plants are small, the ribs will
be tender and can be chopped right in with the rest of the leaves. As
the plants mature, the ribs become more woody so best to slice them out
and compost them.
Kale is incredibly nutritious. A 3.5 oz. serving (100g) gives
you 7% of an adult's protein needs for the day as well as 5%- 15% of
several vitamins and minerals. It is also very high in fiber.
(LINK: Health Benefits of Kale)
This
'ANDI' chart (below) lists 72 foods, rating them by their
concentration of nutrients per calorie. Kale is #1! They're not
suggesting that you rule out the foods that are higher in calories and
less dense in nutrients (healthy bodies
need high-quality fats, carbohydrates and protein) but most of us are deficient in the
micro-nutrients (vitamins, minerals etc) and fiber, that are essential for all our metabolic processes and optimal health. (
LINK: Aggregate Nutritional Density Index - note, kale is #1) (
LINK to one-page, printable ANDI chart).
 |
| 'Rob' with kale 'raab' |
Here's another post we wrote about the health benefits of Kale: